While working on new algorithms and data structures in robotics, it's often helpful to visualize data in 3D. Certainly, it's possible for our minds to comprehend much larger amounts of data and perform visual error-checking in 3D than in the console. But I've met many bright developers who feel daunted by tools like Unity and Unreal Engine and end up trying to visualize complex 3D environments using 2D grayscale maps instead.
Enter OpenSceneGraph (OSG). OSG is an open source, cross-platform 3D rendering library written in C++ that's much easier to get up and running. There's still a learning curve, but it's short enough to be covered in a blog post like the one you're reading.
"Why not use a standard tool like Gazebo for this?" you may be wondering. Well, in most cases, especially in professional environments, you may not be building in ROS. Perhaps ROS will one day become widely adopted enough that we can rely on Gazebo, but such is still not the case today.
This guide is meant to springboard those developers looking to visualize 3D scenes in a quick-and-dirty manner—we won't be worrying about realistic shadows, materials, and other effects. If that sounds like you, keep on reading!
Introduction
I won't be getting into the installation of OpenSceneGraph. But for reference, after installation, if you have trouble linking your first project to the OpenSceneGraph library, here is a sample CMakeLists.txt file to get you started (don't worry, I was new to CMake when I started, too).
CMakeLists.txt
CMAKE_MINIMUM_REQUIRED(VERSION 2.6)
PROJECT(osgExample)

FIND_PACKAGE(OpenSceneGraph REQUIRED COMPONENTS osgViewer osgDB osgGA osgText)

SET(CMAKE_CXX_FLAGS "${CMAKE_CXX_FLAGS} -std=c++11")

INCLUDE_DIRECTORIES(
    ${OPENSCENEGRAPH_INCLUDE_DIRS}
)

ADD_EXECUTABLE(osgExample main.cpp)

TARGET_LINK_LIBRARIES(osgExample
    ${OPENSCENEGRAPH_LIBRARIES}
)
CMakeLists.txt
Smart Pointers
Before we dive into building your first scene graph, just be
aware that OSG ships with its own brand of smart pointers,
called osg::ref_ptr<>. Just like
std::shared_ptr<>, which you may be used to, these
pointers maintain a count of how many times an object is
referenced and will automatically delete the object when its
reference count falls to zero. Unlike
std::shared_ptr<>, the reference count in OSG also
increments when an object is added to the scene graph and
likewise decrements when the object is removed. Generally, it's
good practice to use these smart pointers as much as possible.
You'll find in examples that even the helper methods for
constructing OSG objects for us will generally return a smart
pointer to the constructed object rather than a regular pointer.
Good practices like these will help prevent memory leaks or our
objects being deleted when we least expect it.
Nodes
First and foremost, OpenSceneGraph is about constructing a graph, and for the purposes of this guide we can abstract away the specifics of how that graph is actually rendered into the 2D picture that appears on your screen and worry instead about creating just that graph. In fact, let's simplify further: for most purposes, your scene graph will really just be a scene tree.
Now, a tree consists of nodes, one of which is the root. This is
the root of your scene, and you'll see later that we specify
setSceneData(root) to define the point where
rendering begins. All other nodes will have one parent (in this
guide, anyway) and zero or more children. There's two main types
of nodes: group nodes and leaf nodes. Groups can have one or
more children, and they may apply some sort of transform or
special properties to all downstream children. Leaf nodes, on
the other hand, cannot have children. They describe some sort of
geometry or specific 2D/3D object in the scene, like a triangle
or a .3ds model imported from a CAD program.
Geodes
With that, let's jump right in. Geodes are a special type of
leaf node which define geometries; in fact geode is short for
geometry node. The way to use these is to create one or more
osg::Drawables defining some geometry (like a line,
triangle, sphere, text, etc.) and add it to your geode using
geode->addDrawable(geom). Then, add your geode to
the scene graph under a group node with
group->addChild(geode).
Let's expand on three types of drawables you can use inside geodes—geometries, shapes (yes, they're different), and text.
Geometries
Geometries are custom user-defined shapes. By combining individual shapes like triangles and quads, you can create shapes as simple as hexagons or as complex as pentagonal trapezohedrons—or really any shapes you can think of, including point clouds and nonconvex crescents. Let's start by creating a triangle.
main.cpp
#include <osg/Referenced>
#include <osg/Geometry>
#include <osg/Geode>
#include <osg/Array>
#include <osgViewer/Viewer>

int main(int argc, char** argv)
{
    // Create the geometry which will define the triangle
    osg::ref_ptr<osg::Geometry> myTriangleGeometry = new osg::Geometry;

    // Define the triangle's 3 vertices
    osg::ref_ptr<osg::Vec3Array> vertices = new osg::Vec3Array;
    vertices->push_back(osg::Vec3(0, 0, 0));
    vertices->push_back(osg::Vec3(100, 0, 0));
    vertices->push_back(osg::Vec3(0, 0, 100));
    myTriangleGeometry->setVertexArray(vertices);

    // You can give each vertex its own color, but let's just make it green for now
    osg::ref_ptr<osg::Vec4Array> colors = new osg::Vec4Array;
    colors->push_back(osg::Vec4(0, 1.0, 0, 1.0)); // RGBA for green
    myTriangleGeometry->setColorArray(colors);
    myTriangleGeometry->setColorBinding(osg::Geometry::BIND_OVERALL);

    // Turn off lighting
    myTriangleGeometry->getOrCreateStateSet()->setMode(GL_LIGHTING, osg::StateAttribute::OFF);

    // Turn on blending
    myTriangleGeometry->getOrCreateStateSet()->setMode(GL_BLEND, osg::StateAttribute::ON);

    // Define the geometry type as 'triangles'
    myTriangleGeometry->addPrimitiveSet(new osg::DrawArrays(osg::PrimitiveSet::TRIANGLES, 0, vertices->size()));

    // Finally, let's add our triangle to a geode
    osg::ref_ptr<osg::Geode> myGeode = new osg::Geode;
    myGeode->addDrawable(myTriangleGeometry);

    // And now we can create a viewer to look at our geode
    osgViewer::Viewer viewer;
    viewer.setSceneData(myGeode);
    return viewer.run();
}
main.cpp
If you build and run this, you should be able to launch a window
with a green triangle that you can spin around by clicking and
dragging your mouse. Play around with it. Try adding 6 vertices
instead of 3 and change the primitive type from
TRIANGLES to LINE_LOOP. Now switch it
to LINES, or LINE_STRIP Can you tell
what these do?
Your first OSG geometry.

Your first OSG geometry.
In this case, we chose to BIND_OVERALL, meaning we
assigned a single color to the entire geometry. But we can
actually assign individual colors at each vertex—OSG will
blend the colors together for you if you add two more colors in
the colors array and replace
BIND_OVERALL with BIND_PER_VERTEX.
Lighting is used to darken and lighten objects in the scene depending on the direction of the light source of the scene. For our purposes, they just make details hard to see so we turn them off. Blending enables helpful effects like transparency so we leave it on.
By specifying TRIANGLES to the geometry, we've
defined that we want to interpret every three vertices as a new
triangle. Of course, there's plenty of other primitive types.
Here's a non-exhaustive list to get you started:
| # | Primitive Type | Description |
|---|---|---|
| 1 | POINTS |
Renders each vertex as a point |
| 2 | LINES |
Connects every pair of vertices with a line |
| 3 | LINE_STRIP |
Draws a line connecting every point in sequence |
| 4 | LINE_LOOP |
Same as LINE_STRIP but also connects the beginning and end |
| 5 | TRIANGLES |
Renders every triplet of points as a triangle |
| 6 | TRIANGLE_STRIP |
Renders triangles with shared edges (see details here) |
| 7 | TRIANGLE_FAN |
Renders triangles with a shared vertex (see details here) |
| 8 | QUADS |
Renders every 4 points as a quad |
| 9 | QUAD_STRIP |
Renders quads with shared edges |
Shapes
A variety of other basic shapes exist for quickly adding 3D
objects to scenes, such as Sphere,
Box, Cone, and Cylinder.
They behave similarly to geometries in that they are attached to
geodes using addDrawable().
Text
Adding text to scenes is done using the Text class
in the osgText namespace. Simply create an
osgText::Text object and attach it to a geode using
addDrawable(). Common methods used with text are:
setText()setPosition()setFont()setColor()-
setAxisAlignment()Place the text on the XY, YZ, XZ, or other planes. -
setAlignment()Options here include centered, left-aligned, right-aligned, etc. setCharacterSize()
Groups
As mentioned before, groups are simply a type of node in the
scene graph which contain children. Some groups, like
osg::Group don't have any special
properties—they simply help organize your scene graph in
an intelligible way. Others apply special properties to their
children.
Below is a code snippet with a short example of how to use
groups in your scene graph. To run the code snippet, you will
need to download the example dataset for your version of
OpenSceneGraph here,
unzip it to a folder, and point an OSG-specific environment
variable called $OSG_FILE_PATH to that folder so
the files can be found at runtime. If you don't set
$OSG_FILE_PATH, you'll have to provide paths to
each model, like cessna.osg.
main.cpp
#include <osg/Group>
#include <osgDB/ReadFile>
#include <osgViewer/Viewer>

int main(int argc, char** argv)
{
    // Root node of the scene
    osg::ref_ptr<osg::Group> root = new osg::Group;

    // Read "cessna.osg" file
    osg::ref_ptr<osg::Node> mynode = osgDB::readNodeFile("cessna.osg");
    if (!mynode)
    {
        printf("Node not loaded, model not found\n");
        return 1;
    }

    // Add cessna to the scene
    root->addChild(mynode);

    // And now we can create a viewer to look at our geode
    osgViewer::Viewer viewer;
    viewer.setSceneData(root);
    return viewer.run();
}
main.cpp
Transforms
You might be thinking, "That covers adding objects to the scene,
but how do you actually position them in the scene?". Well,
there's two main ways of transforming objects in OSG:
PositionAttitudeTransform and
MatrixTransform. Both achieve the same results, but
their interfaces differ.
For PositionAttitudeTransforms, or PATs for short you apply a
setPosition(), setAttitude(), and/or
setScale() to transform all children downstream in
the scene graph. Try to imagine how this could be used to
construct a robot arm in OSG—a relatively linear scene
graph where each linkage of the arm would be added under its own
osg::PositionAttitudeTransform, which itself would
be a child of the previous linkage of the arm. Changing the
position or attitude of any linkage would automatically
transform the downstream linkages.
MatrixTransforms behave the same way, but rather than setting a
position or attitude, you set a Matrix instead.
Try running the following example to iteratively rotate a 3D model of a glider:
main.cpp
#include <osgViewer/Viewer>
#include <osgDB/ReadFile>
#include <osg/Group>
#include <osg/MatrixTransform>
#include <osg/Matrix>
#include <osgGA/TrackballManipulator>

int main(int argc, char** argv)
{
    // Root node of the scene
    osg::ref_ptr<osg::Group> root = new osg::Group;

    // Add axesNode under root
    osg::ref_ptr<osg::Node> axesNode = osgDB::readNodeFile("axes.osgt");
    if (!axesNode)
    {
        printf("Origin node not loaded, model not found\n");
        return 1;
    }
    root->addChild(axesNode);

    // Add a MatrixTransform under root
    osg::ref_ptr<osg::MatrixTransform> mt = new osg::MatrixTransform;
    root->addChild(mt);

    // Add gliderNode under MatrixTransform
    osg::ref_ptr<osg::Node> gliderNode = osgDB::readNodeFile("glider.osg");
    if (!gliderNode)
    {
        printf("Glider node not loaded, model not found\n");
        return 1;
    }
    mt->addChild(gliderNode);

    // Create the viewer
    osgViewer::Viewer viewer;
    viewer.setSceneData(root);
    viewer.realize();

    // Attach a manipulator (it's usually done for us when we use viewer.run())
    osg::ref_ptr<osgGA::TrackballManipulator> tm = new osgGA::TrackballManipulator;
    viewer.setCameraManipulator(tm);

    int angle = 0;
    while (!viewer.done())
    {
        // Define the MatrixTransform's matrix
        osg::Matrix mRot  = osg::Matrix::rotate(osg::DegreesToRadians(double(angle)), osg::Z_AXIS);
        osg::Matrix mTrans = osg::Matrix::translate(5, 0, 0);
        osg::Matrix m = mRot * mTrans; // Translate then rotate
        mt->setMatrix(m);

        // Increment angle and wrap around for safety
        angle = (angle+1) % 360;

        viewer.frame();
    }

    return 0;
}
main.cpp
In this case, we can see that the glider is translated along the
x-axis and is rotating relative to the origin of the scene,
marked by the set of axes. Note that viewer.run()
in the previous examples was automatically attaching a
manipulator to the scene for us. When we use
viewer.frame(), we have to create and attach our
own to enable zooming and panning.
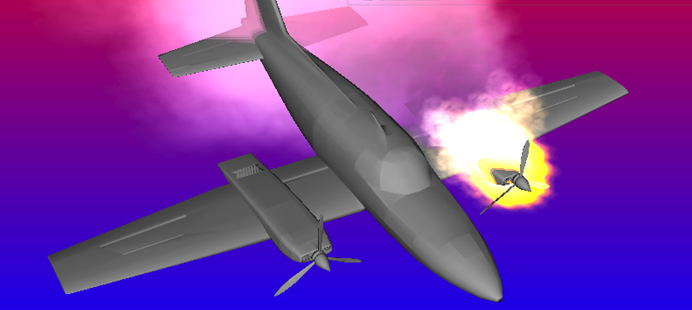
The glider is translated along the x-axis then rotated about its z-axis.

The glider is translated along the x-axis then rotated about its z-axis.
Switches
Switches are used to selectively hide or show objects in the
scene. It's hard to find this written down anywhere, but it's
generally not a good idea to removeChildren()
from your scene graph often—rather, you should use
osg::Switch or node->setNodeMask() to
hide and show your nodes. To use a switch, initialize the
switch, add it to the scene, give it some children, and use
setChildValue() or setSingleChildOn()
to make them visible or invisible.
LODs (Level of Detail)
LOD group nodes are used to make objects visible or invisible
depending on the distance of the camera from the object. When
you add a child, you also specify a range like so:
lod->addChild(node, 0, 1000). LOD nodes are often
used for paging terrain data in and out—for example, when
you zoom far out some high resolution terrain tiles can get
replaced by lower resolution ones, putting less burden on the
system and resulting in a smoother scene (all without the user
knowing).
Conclusion
Well, that's a whirlwind tour of OpenSceneGraph. Of course, there's much more to it, including handling mouse interactions using intersections, keyboard interactions using event handlers, other types of manipulators, and autotransforms and billboards—perhaps for another blog post. Until then, these principles alone will get you pretty far with quickly creating complex 3D environments to visualize your algorithms. For more details, look to OSG Quick Start Guide. As you become more familiar, you can even take advantage of the open-source nature of OSG and explore the source code of applications like osgViewer, a command line utility that ships with OSG. Please feel free to share your adventures, and remember that play makes perfect!